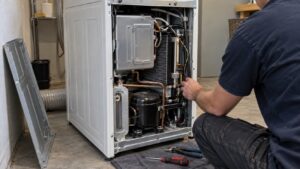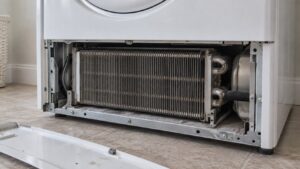

Because Asko’s US dryer lineup is condenser and heat-pump technology rather than exhaust-vented, keeping the asko dryer condenser filter clean matters even more than it would on a simple vented machine — there is no exhaust duct carrying lint and moisture outside, so the condenser system inside the dryer has to handle everything the lint filter does not catch.
Where the condenser filter is located
On most Asko condenser and heat-pump dryers, the condenser unit sits behind an access panel at the bottom front of the cabinet, separate from the pull-out lint filter near the door. It is typically a slide-out cassette or a hinged unit that releases with a latch or a quarter-turn fastener — check your specific model’s manual for the exact release mechanism, since it varies slightly across the T208, T411VD, and T5H/T7H model families.
How to clean it once removed
Rinse the condenser unit thoroughly under running water, working from both sides to flush lint and fine debris out of the internal channels rather than just off the surface. A soft brush helps dislodge compacted lint that plain water alone will not clear, particularly in the narrow fin channels where heat exchange actually happens. Let the unit air dry fully before reinstalling — reinstalling while still wet does not damage anything, but it does reduce drying efficiency for the next cycle or two until it fully dries in place.
How often to clean it
Every four to six weeks is a reasonable baseline for regular use, though households running the dryer daily should check more often. A dryer that has started taking noticeably longer to finish a load, or that is leaving clothes warm but not fully dry, is showing the classic symptom of a clogged condenser restricting airflow and heat exchange.
Auto condenser filter cleaning on Style and Logic models
Some Asko dryers in the Style and Logic tiers include an auto condenser filter cleaning feature that reduces, but does not eliminate, the need for manual cleaning. If your model includes this feature and it stops functioning correctly — the filter still fills with lint despite the auto-clean cycle running — that is worth checking on its own, since a malfunctioning auto-clean feature can mask the problem until drying performance has already degraded significantly.
When condenser cleaning does not restore drying performance
If drying times remain long even after a thorough condenser cleaning, the issue may sit deeper in the system — a failing heat pump component, a blocked internal air path beyond the condenser itself, or a heating element failure. Our dryer repair service covers this diagnosis, and our dryer error code pages are worth checking first in case your model’s display is also showing a related problem. You can book a visit if condenser cleaning alone does not resolve the issue.
Confirming your model’s asko dryer condenser filter design
Condenser assembly design differs somewhat across the T208, T411VD, and T5H/T7H model families, so if the general removal steps above do not match what you see on your specific unit, check the manual or Asko’s dryer support pages for your exact model before forcing an unfamiliar latch or fastener. If you have recently moved into a home with an existing Asko dryer and are not sure when the condenser was last cleaned, treat the first cleaning as a baseline reset — remove and thoroughly clean it once regardless of how it looks, then establish your own four-to-six-week schedule going forward based on your household’s actual usage pattern.
What a consistently dirty asko dryer condenser filter can indicate
If the condenser fills with an unusual amount of lint even on a normal cleaning schedule, check whether your lint filter routine, covered in a separate guide, has been consistent — a condenser doing extra work to catch lint the upstream filter should have caught wears out faster and needs cleaning more often than the schedule described above assumes.
Keep the manufacturer’s cleaning instructions for your specific condenser design accessible, since the exact release mechanism and cleaning approach can differ enough between model families that working from memory alone risks forcing a latch that actually needed a different motion.
A brief visual check of the reservoir or drain path each time you clean the condenser, confirming water is actually flowing or collecting as expected, adds only a few seconds to the routine and can catch a developing drainage issue well before it causes a noticeable performance drop.